This guide assumes you have already added a charger to GridFlow Core. If you haven’t, please refer to the Adding Your First Charger guide first.
Overview
Adding your first RFID card involves two main steps:- Creating a Card Holder
- Creating an Access Profile and restriction limits
- Adding an RFID card to the Card Holder
Understanding Access Methods
Before adding an RFID card, it’s important to understand the two primary ways to use chargers in the GridFlow Core System.
Using RFID
This is the primary method for your team and internal members. You’ll manually set up RFID Cards for each user, making it unsuitable for public use.
Using GridFlow Drive
This method is designed for public usage. Users can access your chargers through the GridFlow Drive Web or Mobile App by scanning a QR code on the EV Charger.
Access Control Overview
GridFlow Drive
Managing Card Holders
Managing RFID Cards
Creating a Card Holder
It’s essential to create a Card Holder before adding individual RFID cards. A Card Holder represents the primary person who will be using the card and serves as the point of contact for anything related to this card.

Add new Card Holder
Click on the “Add Card Holder” button in the top left of the table. A sidebar will open on the right of the screen.
Fill Card Holder Details
Provide the following information:
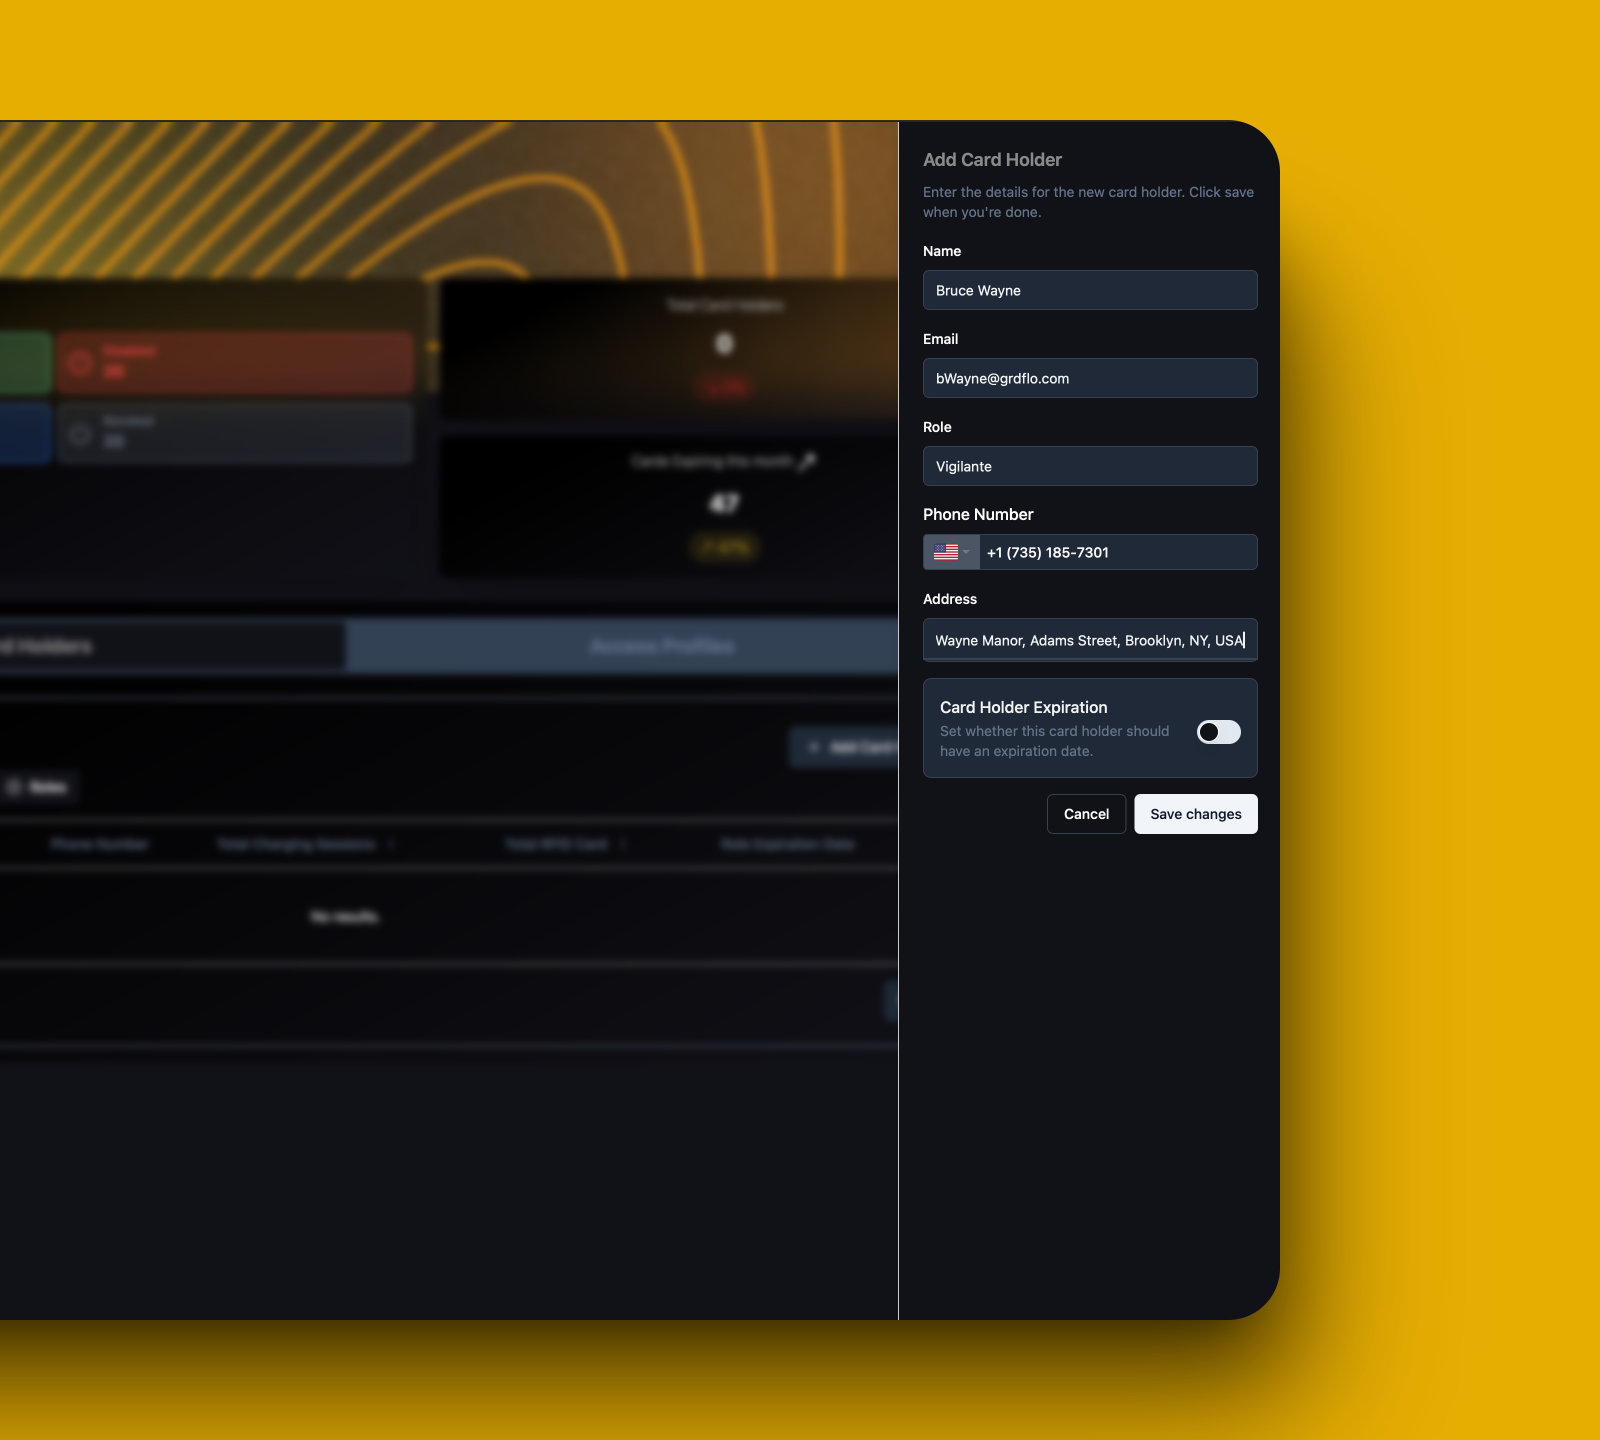
Name
Name
Enter the full name of the card holder
Email
Role
Role
Specify the card holder’s position or designation
Phone Number
Phone Number
Enter a contact number for the card holder
Address
Address
Provide the card holder’s address
Card Holder Expiration
Card Holder Expiration
Congratulations! You’ve successfully created your first Card Holder.
Creating an Access Profile
Before adding RFID cards, you need to create an Access Profile that defines when and where the cards can be used. Access Profiles help manage permissions across your charging network.

Create New Profile
Click on the “Create New Access Profile” button in the top right of the table. A modal will open.
Basic Profile Setup
Profile Name
Profile Name
Choose a descriptive name for your profile
Access Scope
Access Scope
- Select Charger Groups from the dropdown (multiple selections allowed)
- Optionally select specific Charge Points (multiple selections allowed)
Description
Description
Add a clear description explaining the profile’s purpose and scope
Set Up Restriction Limits
Restriction limits define when and how much charging is allowed for cards using this profile.
Allowed Weekdays
Allowed Weekdays
For each day, set:
- Active days (select which days to allow)
- Start Time
- End Time
Time Limits
Time Limits
Set maximum duration limits:
- Daily Max Time (Hours)
- Weekly Max Time (Hours)
- Monthly Max Time (Hours)
- All Time Max Time (Hours)
Energy Limits
Energy Limits
Set maximum energy consumption:
- Daily Max Energy (KWh)
- Weekly Max Energy (KWh)
- Monthly Max Energy (KWh)
- All Time Max Energy (KWh)
Example Configuration
Example Configuration
Allowed Weekdays:
- Monday: 10:30 - 18:00
- Wednesday: 02:30 - 23:00
- Daily: 5.5 hours
- Weekly: 1.5 hours
- Daily: 23 kWh
- Weekly: 82.5 kWh
- Monthly: 597.5 kWh
- All-time: 3679.5 kWh
Review and Save
- Review the summary section
- Add a description for the restriction limit
- Click “Save Changes”

You’ve successfully created an Access Profile! Now you can proceed to add RFID cards and assign them this profile.
Adding an RFID Card
Now that you’ve created a card holder, let’s add an RFID card to their profile.
Initiate RFID Card Addition
Click the “Create a new RFID” button in the top right of the RFID Cards table. A sidebar will open on the right.
Enter RFID Card Details
Provide the following information:

UID (Unique Identifier)
UID (Unique Identifier)
Type
Type
Select one of the following options:
- Mifare Plus
- Mifare Classic (not recommended)
- Mifare DESFire
Card Status
Card Status
Choose whether the card should be:
- Enabled (ready for immediate use)
- Disabled (can be enabled later)
Access Profile
Access Profile
Card Expiration
Card Expiration
Congratulations! You’ve successfully added your first RFID card to GridFlow Core.
Verification
If everything went smoothly, you should now see:- Your new RFID card listed in the Card Holder’s RFID Cards table
- The card status as “Enabled” (if you chose to enable it)
- The assigned Access Profile for the card

Next Steps
Now that you’ve added your first RFID card, consider exploring these related features:Managing Access Profiles
Configure and manage access permissions for different user groups
Bulk RFID Card Upload
Learn how to add multiple RFID cards efficiently
Monitoring RFID Usage
Track and analyze RFID card usage across your charger network
Troubleshooting RFID Issues
Resolve common RFID-related problems
Need Assistance?
Need Assistance?
Our support team is here to help:
Email Support
Live Chat
Chat with us in real-time by clicking on the chat icon in the bottom right corner.