This guide assumes you have already added a charger to GridFlow Core. If you haven’t, please refer to the Adding Your First Charger guide first. Process Overview
Required Items
- RFID Card
- Card Holder Details
- Charger Groups Created
Time Required
Approximately 15-20 minutes
Understanding Access Methods
Before adding an RFID card, understand the two primary ways to use chargers in GridFlow Core.
RFID Access
Internal team members, staff, and regular users
- Controlled access management
- Usage tracking per card
- Customizable restrictions
- Card Holder creation
- Access Profile configuration
- RFID card registration
GridFlow Drive
Public users and occasional visitors
- QR code scanning
- Mobile app access
- Instant activation
- None (automatically enabled)
- QR codes pre-configured
Quick Reference
Access Control Overview
Learn about access control basics
Card Management
Advanced card management features
Troubleshooting
Common issues and solutions
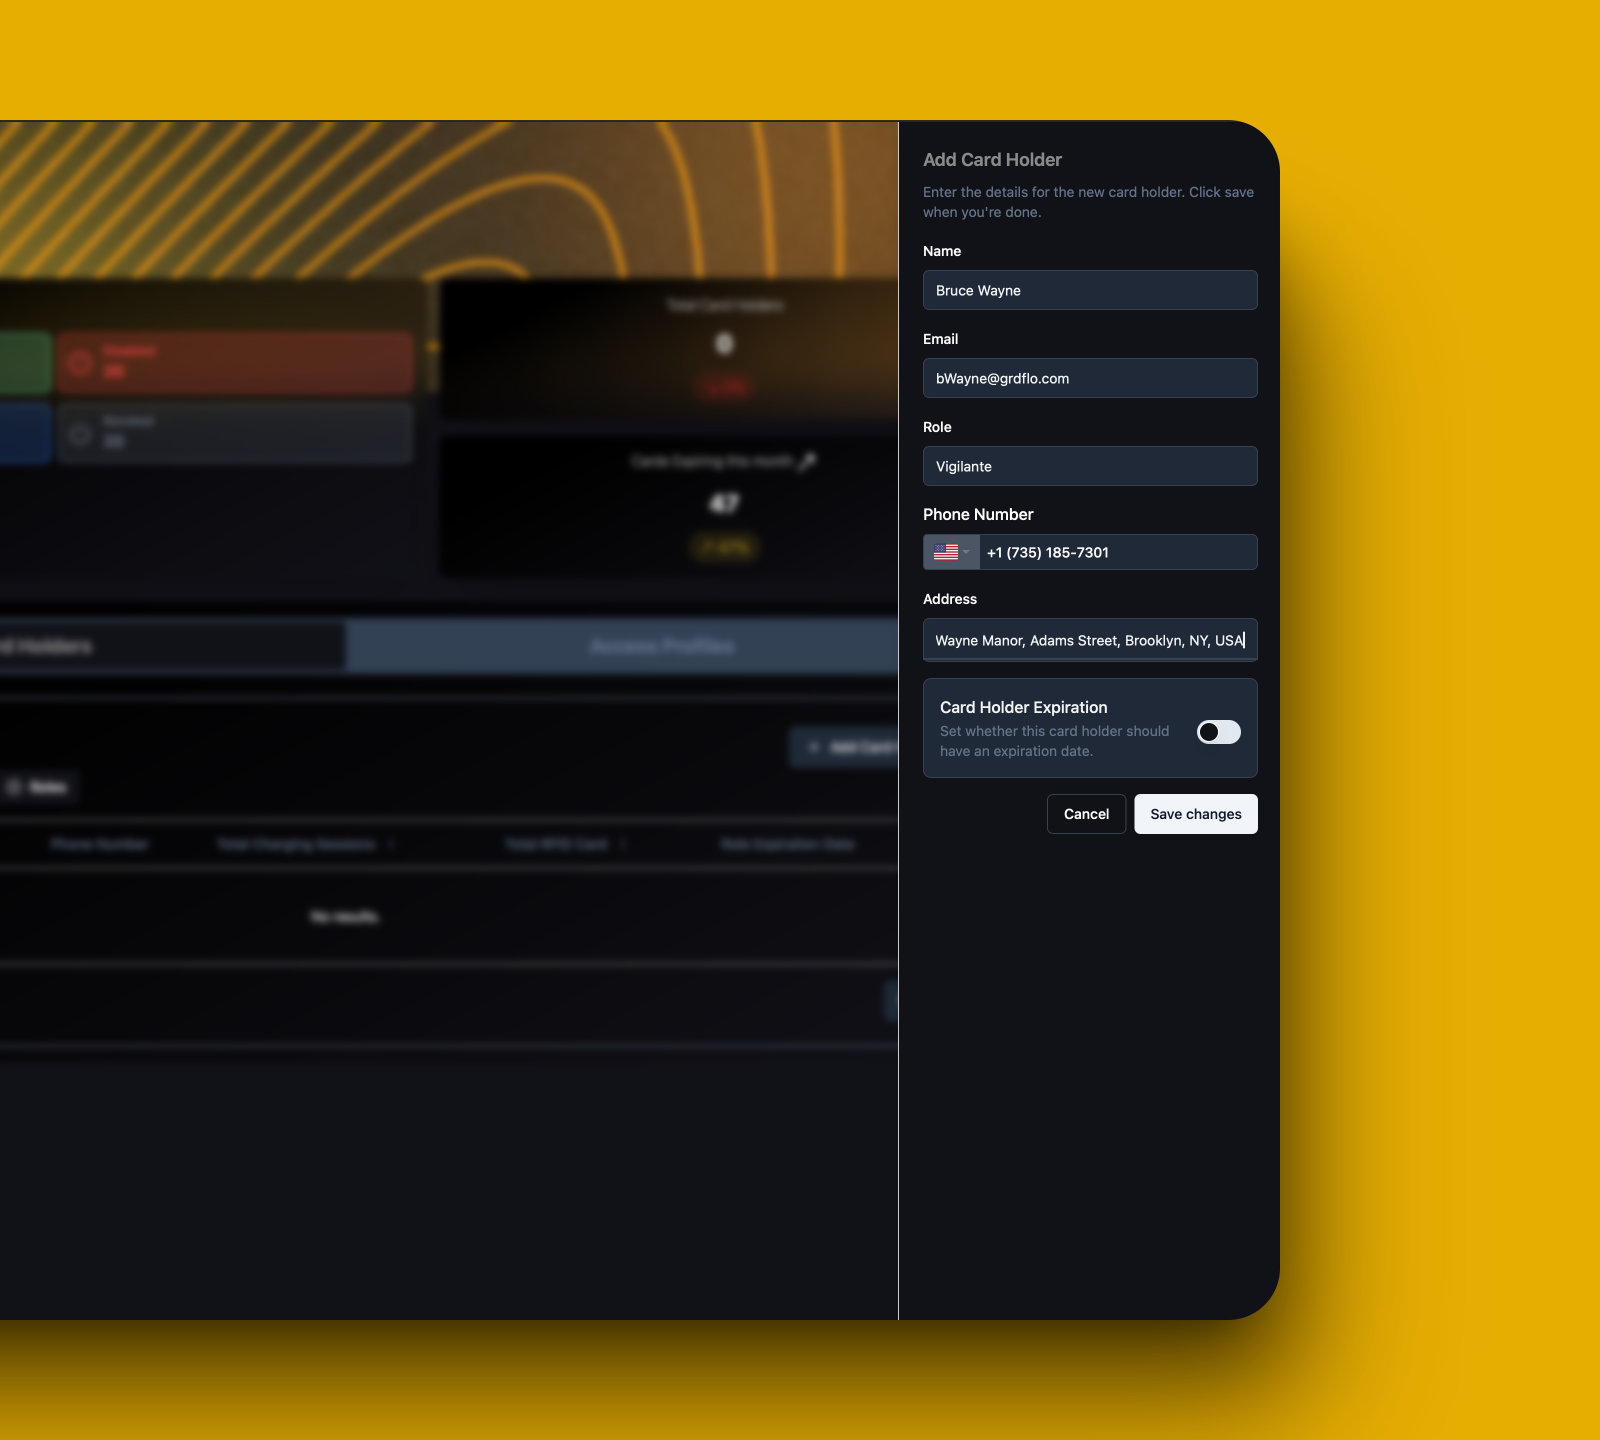
Creating a Card Holder
A Card Holder is the person who will be using the RFID card. This person serves as the point of contact for all card-related matters.
Required Information
- Full Name
- Email Address
- Role/Position
- Contact Details
Optional Details
- Address
- Expiration Date
- Additional Notes
Navigate to Access Control
Access the Access Control page from the sidebar on the left. Open Card Holders Tab
- Click on the “Card Holders” tab
- Locate the “Add Card Holder” button in the top left
Use the search bar to verify if the card holder already exists before creating a new one.
Fill Card Holder Details
- Card Holder Expiration
- Notes
Save Card Holder
Click “Save Changes” to create the card holder profile.Double-check all information before saving. Email addresses and phone numbers should be verified for accuracy.
You’ve successfully created a Card Holder profile! Next, let’s set up an Access Profile.
Creating an Access Profile
Access Profiles define when and where RFID cards can be used, along with any usage limits.
Navigate to Access Profiles
On the Access Control page, select the “Access Profiles” tab. Create New Profile
- Click “Create New Access Profile” button
- A modal will open for profile configuration
Use descriptive names that indicate:
- User group (e.g., Staff, Maintenance)
- Access level (e.g., Full, Limited)
- Location (if specific)
Configure Access Settings
Select which chargers this profile can access:
- Choose Charger Groups
- Select specific chargers (optional)
At least one Charger Group or charger must be selected.
Set when charging is allowed:
- Select active days
- Define time windows
- Set multiple schedules if needed
Configure maximum usage:
- Time limits (daily/weekly/monthly)
- Energy limits (kWh)
- Session limits
Set Up Restriction Limits
Click “Create New Restriction Limit” and configure:
Example Schedule:
- Monday: 10:30 - 18:00
- Wednesday: 02:30 - 23:00
Set maximum durations:
- Daily: 5.5 hours
- Weekly: 1.5 hours
- Monthly: Custom
- All-time: Custom
Configure energy limits:
- Daily: 23 kWh
- Weekly: 82.5 kWh
- Monthly: 597.5 kWh
- All-time: 3679.5 kWh
Review and Finalize
Carefully review all settings as they will affect all cards using this profile.
- Check the summary section
- Add a detailed description
- Click “Save Changes”
Access Profile created successfully! Now let’s add an RFID card and assign this profile.
Adding an RFID Card
RFID cards are physical credentials that allow access to your charging network based on the assigned Access Profile.
Required Items
- Physical RFID Card
- Card’s Unique Identifier (UID)
- Access Profile
- Card Holder
Optional Settings
- Expiration Date
- Usage Restrictions
- Custom Description
Locate Card Holder
- Go to Card Holders tab
- Find your Card Holder in the list
- Click on their name to open details
Use the search function to quickly find Card Holders by name, email, or role.
Initiate Card Addition
In the Card Holder details modal:
- Locate the RFID Cards section
- Click “Create a new RFID” button
Enter Card Details
- Status: Enabled/Disabled
- Access Profile
- Expiration Date (Optional)
- Custom Description
- Notes
- Special Permissions
Double-check the UID entry - incorrect numbers will prevent card access.
Complete Registration
- Review all entered information
- Click “Create” to register the card
- Verify the card appears in the RFID Cards list
- Card status shows as “Enabled”
- Correct Access Profile is assigned
- UID matches physical card
Testing and Verification
Verification Steps
Success Criteria
Check Card Status
Verify in the system:
- Card appears in the list
- Status shows as “Enabled”
- Access Profile is correctly assigned
Physical Testing
- Approach an authorized charger
- Present the RFID card to the reader
- Verify the charger recognizes the card
- Confirm charging session can be started
If the card doesn’t work:
- Verify UID was entered correctly
- Check Access Profile permissions
- Ensure charger is in allowed group
- Confirm card is enabled
System Indicators
- Card status “Active”
- Correct profile assignment
- Visible in card holder’s list
Physical Access
- Card read by charger
- Authorization successful
- Charging session starts
Next Steps and Management
Access Profile Management
Fine-tune access permissions and restrictions
Bulk Card Operations
Manage multiple cards efficiently
Usage Monitoring
Track and analyze card usage patterns
Troubleshooting Guide
Resolve common access issues
Video Tutorials
Step-by-step video guides
FAQ
Frequently asked questions
Support
Contact our support team
Need help? Our support team is available 24/7:Live Chat
Click the chat icon in the bottom right corner